To be honest I was surprised by the lack on comments on the previous posting, I expected at least one ‘I told you so’.
 I did promise to mention how I fixed the curved pieces to the round walled building. These coffee sticks will bend easily when wet.
 Soak the sticks for a while then test them, if they feel supple enough you can curve them. If not, leave them to soak longer, using hot water also helps. I bent these when I was cleaning some more sticks I had brought home.
For cleaning I use boiling water, although I did let it get a bit cooler before working with the sticks in this case.

I curved the sticks around the outside edge of the building, then clamped them to the edge and left them to dry held in place. Once dry they retained their curve and I was able to glue them to the various positions at the top, middle and bottom of the curved wall.
Finally the top one was held in place by an elastic band as the glue dried.
Some progress has been made on these ghost town buildings, they have now finally been sanded down, and have been given four layers of paint.

The first was the black primer which was a pain to go on in the window areas where some of the shiny card had been allowed to show through.
Eventually this was followed by a black and brown (Burnt Umber) 50/50ish mix. These first two layers have to be almost scrubbed on to ensure that all the nooks and crannies are covered. The final layer so far is the pure burnt umber.
This is just painted on quickly going where it touches, in other words deliberately making sure not to work it into the corners so that the aging effect of the darker under layers show through.
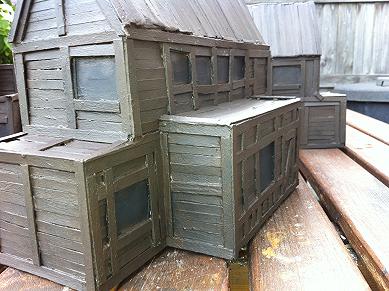
After that it was a white / burnt umber mix. I cannot be very specific as to the proportions of this as I used some left over white paint from a previous project which I had prepared too much of.
(Previously I squirted too much white paint out a few days ago. Thought I would lose it, but I managed to keep it fresh by covering the ‘Pringles’ tub lid I use as a paint pallet (Idea nicked from BigLee) with a ‘Tu’ desert pot. It just so happens that a ‘Pringles’ lid snugly fits these glass pots)

This mix of paint I quickly dry brush /scrub over the entire building to give a mottled look. I work quite quickly with the brush working the paint over, ensuring I keep as best I can to the direction of the wood, but ensuring that the paint is very thin on the brush.
For the building with the curved wall I used an old number 2 brush that has seen better days. For the more flat buildings with larger cover areas I went with an even larger brush.

And finally, this week's teaser from the book. Quite a short one this time.
.... She threw the skull to the floor; it shattered into a million pieces as it hit the chains.
Now if anyone tried to alter any of her spells they would die. The casting was over. Zandina screamed, her vision turned to a dark red then to blackness and she collapsed onto the floor....
To order your personal copy please follow the link below. You'll need a Paypal account to order. Although Amazon is showing it as unavailable I can promise that copies are available to order by going direct to Hundred Publishing. http://www.hundredpublishing.com/derek.html
Thats some great terrain you have there and it looks awesome! It takes great imagination to come up with the idea and then not a little bit of skill to make it a reality...and change the plan as you go of course! Great job and thanks for sharing some of your secrets :-)
ReplyDeleteOne thing I do is go to some lengths to chop up the sticks quite a bit for a more distressed look. In hindsight I probably overdo it a bit as your buildings look all the better for not using this approach.
ReplyDeleteLooking forward to more and now following your Blog!
Oh the irony of it. The one thing I think I need to change is to cut these sticks smaller, because let’s face it the size of the figures and the size of the planks is not very propionate. I was planning on a few smaller models next for this collection and making sure the sticks were cut to smaller lengths. Have you posted any pictures of models with smaller? I would like to see the effect.
DeleteGood stuff mate, they look excellent.
ReplyDeleteI was expecting you of all people to go back and stick a 'I told you so' on the old one just for the sake of it. :)
Delete